Thursday 13 November 2014

Joy to the World

Here's another Christmas card for the Peep of the Week challenge over at Power Poppy.  This image is from Power Poppy's very useful Joyful Arrangements set and was stamped with Memento Tuxedo Black ink onto blending card, coloured with copics and die cut with a Spellbinders Fleur De Lis Square die.  The background papers are from the Rejoice paper pad by Creative Imaginations - one of my favourites - and layered onto blue cardstock.  I used EK's Swirl border punch on the cream piece.  I added a blue ribbon and bow and popped the image piece on with foam tape and that was it - yet another non-traditional Christmas card!!(which, I have to say, is not my usual style.)

Copic Colours used were:  G40, G43, E50, E51, Y21, Y35, B000, B12.

Thanks for coming to visit!

Friday 31 October 2014

Warm Wishes

Here's another card for the Peep of the Week challenge at Power Poppy.  My new Christmas stamps arrived this week so I just had to try one right away!  This gorgeous image is from Power Poppy's Bottlebrush Holiday set.  I stamped it with Memento Tuxedo Black ink onto blending card and added the sentiment in the banner with Memento Teal Zeal ink.  Then I coloured it with copics and die cut it with a Spellbinders Classic Squares die.  The background papers are from Francheville's Whimsical Christmas Basics paper pad.  The horizontal piece was layered onto pink cardstock with one edge punched with an EK border punch.  I die cut some teal cardstock with a Spellbinders Marvelous Squares die and popped the image piece on top with foam tape.  A pink ribbon and a bow was added to the horizontal piece, the whole thing was layered onto teal cardstock and Ta-Dah! - a Christmas card in non-traditional colours.

Copic Colours used were:  BG10, BG32, BG45, BG49, RV000, RV00, RV02, Y21, Y26, BV000, BV02, BV11, BV13.

Thanks for visiting!

Sunday 19 October 2014

White Roses

I made this card for this months challenge at Scrapbook Boutique.  The inspiration photo features white roses, bows and pearls with pale lavender.  I knew straight away what I wanted to do with this one!  I started with lavender cardstock and die cut one side with a SpellbindersA2 Bracket Borders One die, then I embossed the rest with Couture Creations Exotic EF and wrapped white satin ribbon around at the die cut end.  Next, I stamped the roses image from JustRite's With Sympathy clear stamp set, coloured it with copics, die cut it with a Spellbinders Floral Ovals die and added it to the card front with foam tape.  I tied a bow with the satin ribbon leaving long tails and adhered it with the tails twisted to the top left corner.  Finally, I added a Zva Creative pearl flourish.  I enjoyed this one and it has turned out just like the picture in my head - not always the case :)

Copic Colours used were:  BV000, C1, G40, G43.

Thanks so much for coming to visit!

Sunday 12 October 2014

Yellow Roses

Here's another card for the Peep of the Week challenge at Power Poppy.  The weather has really warmed up and the roses are blooming madly in our garden and vases of beautiful smelling flowers fill my house (lucky me!)  So I thought I would use this gorgeous Power Poppy digital image titled "Arranging Roses" for this weeks challenge.  I started with background paper from BoBunny's Country Garden Collection and layered it onto blue cardstock.  Next I cut a strip of yellow cardstock, adhered it to the bottom and wrapped it with blue ribbon.  The sentiment is from Power Poppy's Dynamic Duos set and was stamped onto white cardstock and die cut with a Spellbinders Romantic Rectangles Two die. I coloured the image with copics and die cut it with a Spellbinders Classic Oval.  Then I die cut blue cardstock with a Spellbinders Elegant Ovals die and popped the image piece on top with foam tape. Finally I die cut the butterfly with a Cheery Lynn Exotic Butterfly Mini die, added some tiny black pearls for the body and finished off with a tiny blue bow.

Copic Colours used were:  Y11, Y15, B000, B00, B02, R24, R27, G43, G46, C1, C3, C5.

Thanks for visiting!

Thursday 9 October 2014

Colourful Bouquet

This is my final card for the World Cardmaking challenges over at Power Poppy.  This one is titled "Let's Get Personal" and features an inspiration photo.  I don't have my Christmas stamps yet, so I went with the colours listed - cool pink, hot pink, olive green, faded aqua, cream, white.  I was looking through the Spring Drop paper pad by First Edition and look what I found - a background paper with those exact colours!!  So I layered it onto pink cardstock and wrapped cream cotton lace and pink ric rac braid around one side.  Then I added pale aqua ribbon and a bow.  The image is the gorgeous Countryside Bouquet digital stamp by Power Poppy which I die cut with a Spellbinders Decorative Labels Thirty Four and coloured with copics.  The scalloped circle underneath it is actually hot pink cardstock (truely - even though it doesn't look like it in the photo) and the bottom layer is pale aqua cardstock die cut with a Spellbinders Exquisite Circles die.  The whole image piece was then added with foam tape.

Copic Colours used were:  RV00, RV02, RV32, RV34, BG10, BG32, BG45, BG49, YG03, YG61, YG63, Y11, Y21, Y26.

Thanks for visiting my blog!

Wednesday 8 October 2014

Inspired by Spring

Here's another card for the World Cardmaking challenges at Power Poppy.  This challenge is titled "Spring Forward, Fall Back" to celebrate the different seasons in each hemisphere.  Seeing that I'm a true blue Aussie girl, I naturally decided to make a Spring card, and I thought the most logical choice would be this sweet little image from Power Poppy's Springtime Love set which is stamped with Memento black ink onto blending card, coloured with copics and die cut with a Spellbinders Classic Oval die.  The background papers are from (appropriately) Spring Drop paper pad by First Edition, layered onto lavender cardstock, and the horizontal piece punched with EK's scalloped scallop border punch.  I also added a paper doily and a white picket fence made with Martha Stewart's picket fence border punch - because I thought they looked Spring-y.  Finally, I die cut lavender cardstock with a Spellbinders Floral Ovals die and popped the image piece on top with foam tape.

Copic Colours used were:  V01, V04, V12, RV32, RV34, YG11, YG13, G43, G46, B00, B02.

Thanks for visiting!

Tuesday 7 October 2014

Sepia Tulips

This card is for one of the challenges at Power Poppy to celebrate World Cardmaking Day (which, this year, happened to fall on my birthday - how cool is that?!!)  This challenge is titled "Woot Woot for Tuts" - meaning the challenge is to try one of the Monday Tutorials on the Power Poppy Blog.  I chose the tutorial by the amazingly talented Allison Cope on Colouring in Sepia.  You can find it HERE.  I started with a piece of dark beige cardstock which I embossed with Cuttlebug's Woodgrain EF.  I wrapped some lace and dark brown ribbon around the bottom and layered it onto dark brown cardstock.  Then I die cut some of the dark brown cardstock with a Cheery Lynn Lace Corner Deco B - I made two and added them to the top corners.  Then I stamped the tulips and sentiment from Power Poppy's Dynamic Duos Peonies & Tulips set with Rich Cocoa Memento ink onto blending card, coloured it with copics, die cut it with a Spellbinders Labels Four and sponged around the edges with Versacolor Sand Beige ink.  I added the image piece with foam tape and a dark brown bow finished it off.

Copic Colours used were:  E30, E31, E33, E35, E37, E50, E53, E55.

Thanks so much for coming to visit!

Saturday 27 September 2014

Pink Peonies


I made this card for another Peep of the Week challenge at Power Poppy.  This time, although I now have Power Poppy's Dynamic Duos Peonies & Tulips set (Yay!), I used the digital file for the flowers.  The background papers are from Prima's Meadow Lark paper pad, layered onto yellow cardstock with the vertical piece being punched down one side with a Martha Stewart border punch.  I die cut some pink cardstock with a Spellbinders Marvelous Squares die and added that to the centre of the card front.  I printed the peonies onto blending card, coloured them with copics, die cut them with a Spellbinders Standard Circle and layered them onto yellow cardstock die cut with a Spellbinders Scallop Circle which was then added with foam tape.  I stamped the sentiment from the Dynamic Duos set directly onto the background, added some yellow ribbon and a bow.  For some reason, my pictures are coming out a little dark, but it still looks okay, I think.

Copic Colours used were:  RV52, RV55, RV66, G43, G46.

Thanks so much for visiting!

Wednesday 10 September 2014

Kindness

There's another Peep of the Week challenge over at Power Poppy and this time, I have chosen once again to use the gorgeous Power Poppy Gladioli digital stamp.  The background paper comes from Victoria Park paper pad by Echo Park and the other paper is from Kaisercraft's Fine & Sunny paper pad.  Both are layered onto green cardstock with the central piece having been punched with a Martha Stewart border punch.  The image was printed onto blending card, coloured with copics and cut into a rectangle.  I then die cut some white cardstock with a Spellbinders Lattice Rectangle die and popped the image piece on top with foam tape.  The sentiment is from Power Poppy's Peonies digi set, punched out with a circle punch and layered onto green cardstock die cut with a Spellbinders Standard Circle die, and also added with foam tape.

Copic Colours used were:  Y00, Y11, Y15, YG13, YG17.

Thanks for visiting!

Monday 1 September 2014

Bouquet

I made this card for this weeks "Peep of the Week" at Power Poppy.  This time, I chose to use the gorgeous Countryside Bouquet digi image.  The background papers are from Sky's the Limit paper pad by My Mind's Eye.  I layered the aqua floral piece onto coral cardstock (which looks a little darker than the real life one in this photo) and then I layered the coral chevron piece onto white cardstock which I had punched along the bottom with a Martha Stewart border punch and wrapped aqua spot ribbon around it.  Then I die cut the coral cardstock with a Spellbinders Marvelous Squares die then some aqua cardstock with a Spellbinders Scallop Circle.  The image was printed onto blending card, coloured with copics and added to the scallop circle then popped on top of the square with foam tape.  A bow finished it off.   Not my usual choice of colours, but quite pretty, I thought.

Copic Colours used were:  BG11, BG13, R00, R01, RV00, RV02, G43, G46.

Thanks for visiting!

Wednesday 27 August 2014

Pink Romance

It's time for another Peep of the Week challenge at Power Poppy.  This time, I have used the gorgeous Gladioli digital image created by the amazingly talented Marcella Hawley of Power Poppy.  I decided that I wanted a very romantic feel for this one so I chose my background paper from The Romantic Garden paper pad by Meg's Garden and layered it onto pinky red cardstock.  I wrapped heart shaped lace plus pink seam binding around and added a bow.  The Gladioli image was printed onto blending card, coloured with copics and die cut with a Spellbinders Classic Oval die.  I layered the image piece onto black cardstock die cut with a Spellbinders Opulent Oval die, then onto white cardstock die cut with a Spellbinders Lacey Oval and then onto the pinky red cardstock die cut with another Opulent Oval.  I added a black bling flourish for a bit of zing and it was finished.

Copic Colours used were:  R81, R85, YG61, YG63, YG67.

Thanks so much for coming to visit!

Friday 22 August 2014

Train Travel

This months challenge at Scrapbook Boutique is a masculine one in colours of blue, green and dark brown.  I chose papers from Kaisercraft's Pack Your Bags Collection, layering the stripes and green papers plus one of the diecuts onto dark brown cardstock.  I added some dark brown May Arts net ribbon down one side and a strip of the ticket paper. I stamped the train image from Stamp-It's siset075 with Memento Rich Cocoa ink onto blending card, coloured it with copics, cut it into a square and layered it onto green and blue cardstock.  The sentiment is from Stamp-It's siset046 set and was also stamped with Memento Rich Cocoa.  I guess this challenge is to remind us that it's nearly Father's Day, but this is a birthday card  for my wonderful Dad who actually turns 96 on Father's Day this year!!

Copic Colours used were:  YG11, YG13, YG17, B00, B02, C1, C3, C5, C7.

Thanks for coming to visit my blog!

Sunday 10 August 2014

Riviera Review

This months "Pop Goes the World" challenge at Power Poppy takes us to the Italian Riviera.  I immediately thought...........Geraniums!!  The inspiration picture features turquoise, rusty red, buttery yellow and grassy green.  I chose my background papers from Prima's Zephyr collection paper pad and layered them onto turquoise cardstock, punching along one side of the vertical piece with a Martha Stewart border punch.  I wrapped some satin edged organza ribbon plus some rusty red seam binding around the bottom of the card front and added a bow.  The Power Poppy Geraniums were printed onto blending card, coloured with copics and die cut with a Spellbinders Marvelous Squares die.  I die cut some rusty red cardstock with the next size Marvelous Square die, added it to the card front and popped the image piece on top with foam tape.  I have to say these are not my usual colours, but I'm quite pleased with the way it turned out.

Copic Colours used were:  R22, R24, R27, YG95, YG97, E11, E13.

Thanks for visiting!

Tuesday 5 August 2014

Peace


The latest Friday challenge at JustRite Papercraft is to use a negative die cut - i.e. the piece left after die cutting.  Well, I immediately thought of this Couture Creations die called Venetta Intricutz Sophia Collection that I bought on sale at the Brisbane Papercraft Expo in June - you die cut a flourish but the negative part looks really great.  So, I cut a rectangle of X-press It blending card, punched a short side with Martha Stewart's doily lace border punch, then placed the die on one side and cut and embossed it.  I stamped the bunch of flowers from JustRite's Black-Eyed Susan Vintage Labels Five stamp set with Memento Tuxedo Black ink and coloured it with copics.  The sentiment is from JustRite's With Sympathy set.  I added a black and white check ribbon and bow, then layered the card front onto black cardstock.

Copic Colours used were:  C1, C3, C5, C7, C9.

Thanks so much for coming to visit!

Wednesday 23 July 2014

A Pitcher of Roses

I made this card for this weeks challenge at Power Poppy.  I chose this gorgeous digi image called Arranging Roses, printed it onto blending card, coloured it with copics, die cut it with a Spellbinders Classic Oval and sponged on some blue ink.  The background papers are from First Edition's Floral Pavilion paper pad.  I added a little strip of lace and narrow pink check ribbon across the join and layered it onto blue cardstock.  Then I die cut more blue cardstock with Spellbinders Lattice Pendant and added the image piece with foam tape.  Finally, I popped a little bow in the centre of the ribbon and it was done.

Copic Colours used were:  RV00, RV02, RV04, R22, R24, G21,G24,G28,C1,C3,C5,C7,B0000,B00.

Thanks for visiting!

Thursday 17 July 2014

Beautiful Browns

This months colour challenge at Scrapbook Boutique is for rich browns and cream - lovely!  The image I chose is from Flourishes Sweet Peas set, stamped with Memento Espresso Truffle ink onto blending card, coloured with copics and die cut with the oval from Spellbinders Radiant Rectangles.  I sponged it with Versacolor Vanilla ink to tone down the stark white.  Then I die cut dark brown cardstock with the next size Radiant Rectangle die and mounted the image piece to it with foam tape.  I die cut a piece of  Stampin' Up!'s Very Vanilla cardstock with a Spellbinders A2 Bracket Borders One, cut it to size for the card front and embossed it with Couture Creations Intrinsic EF.  Next, I die cut dark brown cardstock with one of the edge dies from the Bracket Borders set and layered the card front onto it.  I stamped the sentiment from Flourishes Winter Blossom set with Versacolor Pinecone ink onto the vanilla cardstock, cut it into a notched tag, layered it onto brown cardstock and added it to the card front plus a strip of dark brown grosgrain ribbon.

Copic Colours used were:  E23, E25, E27, E29, E41, E43.

Thanks so much for coming to visit!

Bouquet Calendar

This weeks challenge at Power Poppy is to use any Power Poppy stamp - that was easy, but the trouble was...........which one to choose?!  Well, every year, I make these simple little calendars (this one has a Couture Creations tear-off calendar) and I thought the gorgeous new Countryside Bouquet stamp would be perfect for one of these.  I cut heavy cardstock 4" x 5 1/2", covered it with this multicoloured stripe paper from my stash and covered the back with plain white cardstock, including a little ribbon hanger.  I simply printed off the stamp, coloured it with copics, die cut it with a Spellbinders Standard Circle and mounted it with foam tape onto yellow cardstock die cut with a Spellbinders Scallop Circle.  I add a magnetic strip to the back for those who like to keep this on the fridge and it was done!

Copic Colours used were:  RV00, RV02, Y11, Y17, V04, V12, YG11, YG13, G40, G43.

Thanks for coming to visit!

Monday 14 July 2014

Three Ornaments

This weeks challenge at JustRite Papercraft is for a Christmas card in non-traditional colours.  Well, my first thought was for a great paper pack by Francheville called Whimsical Christmas Basics which comes in pink, purple and teal - papers sorted!  So I chose the candy cane paper for the background and layered it onto pink cardstock.  Then I layered the star paper onto white cardstock which had been punched on one side with an EK border punch.  I stamped the small ornament from JustRite's Merry & Bright set with Memento Rosebud ink onto blending card twice and coloured part of them with copic V17.  Next, I stamped the large ornament from JustRite's Deck The Halls set with Memento Tuxedo Black onto blending card and coloured it with copics V17 and RV55. I cut out all three ornaments, added narrow white satin ribbon "hangers" and bows, and added the ornaments to the star paper, using foam tape for the large one.  So, that's my first Christmas card for this year made!!

Thanks so much for visiting!

Monday 7 July 2014

Green & Gold Glory

This weeks challenge at Power Poppy is titled "Let Freedom Ring".  This challenge has three parts - 1. to use a Power Poppy stamp, 2. to use colours representing your country, 3. to use one of the free (yes, free!) digital stamps on the Power Poppy blog.  Well, as a true blue Aussie girl, I decided to use the Australian sporting colours of green and gold.  I chose my papers from Basic Grey's Out Of Print paper pad, layering the background onto dark green cardstock, and punching both sides of the vertical strip with EK's scalloped scallop border punch.  I chose the Benjamin Franklin quote from the free digis, printed it small and die cut it with a Cuttlebug slider die.  I inked the edges with Memento Cottage Ivy ink, and, instead of using ribbon, threaded it onto a strip of the background paper layered onto dark green cardstock.  I chose the brand new Power Poppy Geraniums digital stamp for the image, coloured it with copics, die cut it with a Spellbinders Classic Oval die and added it with foam tape onto dark green cardstock die cut with a Spellbinders Elegant Oval die .

This post is dedicated to my great-nephew, Matthew Hauser, who was to represent Australia in Triathlon at the Youth Olympics in China next month.  Sadly, Matt was hit by a car during training last week.  He is recovering in hospital, but his injuries mean he will no longer be able to wear the green and gold at the Youth Olympics - such a cruel blow for a sixteen-year-old who has worked so hard to achieve his dreams, but we are thankful that his injuries weren't worse and he will recover to "fight another day"!

Copic Colours used were:  Y00, Y21, Y35, YG61, YG63, YG67.

Thanks so much for coming to visit!

Wednesday 2 July 2014

Garden of Friends

Well, this week at JustRite Papercraft, it's one of my favourite type of challenges - a Sketch Challenge.  Yay!  Some new JustRite stamps have recently arrived to live at my house, so I chose one of them - Poppies Labels Twenty Nine.  I found the smaller image would fit nicely into a circle for the sketch, so I stamped it with Memento Tuxedo Black onto blending card, coloured it with copics and die cut it with a Spellbinders Standard Circle.  Then I die cut red cardstock with a Spellbinders Scallop Circle and layered the image piece onto it, and then onto a paper doily.  I chose my background papers from a cute little paper pad from My Mind's Eye called Gnome Sweet Gnome. All the little notched tags on the sketch had me thinking for a while, and, in  the end, I cut three from the same paper pad, and two from red stitched ribbon, and added a sentiment from the Poppies stamp set to the middle tag.  This was certainly a fun sketch from the JR girls.

Copic Colours used were:  R22, R24, R27, R89, YG93, YG95, YG97.

Thanks for visiting my blog!

Monday 30 June 2014

Azalea Love

I made this card for the last Peep of the Week challenge for this month at Power Poppy.  To my utter delight, my card was chosen as one of last weeks winners, so look to the right and admire my brand new blog button!!  I absolutely adore Power Poppy's beautiful Azalea stamp set, and, happily the small image fits perfectly in one of the Spellbinders Radiant Rectangle dies.  So, for this card, it was just a matter of die cutting white cardstock and purple paper from Kaisercraft's Violet Crush paper pad, stamping the vase of azaleas and colouring them with copics, and putting it all together.  I added a purple seam binding bow and tied on the "love" sentiment from Power Poppy's Springtime Love set with gold cord and it was done.

Copic Colours used were:  V000, V04, V12, G40, G43, B0000, C1.

Thanks for coming to visit!

Wednesday 25 June 2014

A Day for Tulips

There's another Peep of the Week challenge at Power Poppy - again for any creation using Power Poppy stamps.  Well, it's a cold, bleak Winter day here in sunny(?) Queensland so I decided that I needed to use some warm, bright colours to cheer me up.  So I started with a nice piece of yellow paper from the Citrus Stack by DCWV and layered it onto red cardstock.  Next, I printed out the wonderful Power Poppy Tulips, die cut them  with a Spellbinders Decorative Labels Eight and coloured them with copics.  Then I used the sentiment from the Gladiolis set, punched it out with a circle punch and layered it onto the yellow background paper and then onto red cardstock that I die cut with a Spellbinders Scallop Circle die.  I have just added the Spellbinders A2 Bracket Borders One to my collection, and it was calling out to be used, so, with red and white cardstock, I made the fancy little piece at the bottom (so satisfying to use a new toy!).  I threaded some narrow red and gold ribbon through the top of the image piece, added a bow and attached the sentiment piece with foam tape.

Copic Colours used were:  R22, R24, R27, Y11, Y15, YG11, YG13, YG17.

Thanks so much for coming to visit!

Wednesday 18 June 2014

Pansy Basket

This weeks challenge at JustRite Papercraft is a Colour Challenge using Pink, Yellow and Purple.  I have just received the beautiful new Pansies in Spring set so I just HAD to go with that one!  I chose my background papers from Kaisercraft's Lilac Avenue Collection and layered them onto purple cardstock after punching one side of the vertical panel with the EK scalloped scallop border punch.  Next, I wrapped some sheer white ribbon with satin edges around near the bottom.  I die cut pink cardstock with a Spellbinders Captivating Squares die and then purple cardstock with a Spellbinders Marvelous Squares die and then added them to the card front.  I stamped JustRite's Pansy Basket with Memento Tuxedo Black ink onto blending card, coloured them with copics, die cut them with a Spellbinders Standard Circle die, sponged some Versacolor Orchid ink around the edge and added this piece with foam tape.  A white seam binding bow finished it off.

Copic Colours used were:  Y11, Y15, Y17, BV000, BV00, BV02, V17, RV02, YG11, YG13, YG17.

Thanks for visiting my blog!

Purple Peonies


There's a new challenge over at Power Poppy called Peep of the Week.  This one is titled "Show Us Your Stuff" - i.e. make something using one of the fabulous Power Poppy stamps.  Well, that was no hardship at all - the difficult part was choosing which one to use!!  However, I'm a big fan of these wonderful peonies and purple is my favourite colour, so I went with that.  My background papers are from Kaisercraft's Violet Crush paper pad, layered onto purple cardstock.  I covered the join in the papers with black cardstock punched out with Martha Stewart's doily lace punch, and added narrow gold ribbon and a trailing bow.  I die cut metallic gold cardstock with a Spellbinders Exquisite Circles die, then black cardstock with a Spellbinders Scalloped Circles die, layered them together and added them to the card front with foam tape.  Next, I die cut the digitally printed Peonies with a Spellbinders Standard Circle die, coloured them with copics and attached the image piece to the black circle.  Finally I added a small gold butterfly charm to keep with the gold theme.

Copic Colours used were:  V000, V04, V06, V12, G40, G43.

Thanks for coming to visit!

Tuesday 3 June 2014

Marigolds

The challenge at JustRite Papercraft this week is to make a card with a matching envelope.  Well, I usually decorate the outside of a ready-made envelope to match my cards, but this time I thought I would make an envelope with a matching interior.  I decided this lovely image from JustRite's Seeds of Summer stamp set would be perfect for this purpose so I stamped the image with both Versacolor Orange and Canary all over a piece of white paper, made the envelope using a score pad and stuck the decorated piece inside.  For the card, I chose background papers from The Citrus Stack paper pad by DCWV, layered the large piece onto orange cardstock, punched a border with a Martha Stewart punch onto some white cardstock and layered the horizontal piece onto that, and added a striped layer as well.  The marigold image was stamped with Memento Tuxedo Black onto blending card, coloured with copics, die cut with a Spellbinders Classic Oval and layered onto another oval of orange cardstock.  Then I die cut white cardstock with Spellbinders Lattice Pendant and added the image piece with foam tape.  The sentiment and its border also come from JustRite's Seeds of Summer set and was also added with foam tape.

Copic Colours used were:  YR00, YR02, YR04, Y11, Y15, Y17, G40, G43, G46.

Thanks for coming to visit!

Sunday 25 May 2014

Seeing Red

The last challenge for Power Poppy this month is a Sketch.  OOOooooo  I love a sketch challenge!  I seem to have been in a "red mood" lately, so I chose my background papers from the Playdate paper pad by My Mind's Eye and layered all three pieces onto red cardstock.  Next, I die cut more red cardstock with a Spellbinders Labels 20 die and embossed it with a Cuttlebug EF.  Then I die cut white cardstock with a Spellbinders Classic Oval, embossed it and sponged on pale blue ink.  I chose for this one the wonderful Peonies from this months Power Poppy release, coloured them with copics, cut them out, and popped them on top of the oval with foam tape.  I decided on two white flower brads for that element of the sketch and finished with some red bling.  Many thanks to the Bloom Brigade at Power Poppy for the challenges this month - it's been fun, and I hope there are many more to come.

Copic Colours used were:  R00, R22, R24, R27, R89, G40, G43, G46.

Thanks for coming to visit!

Friday 23 May 2014

Pretty Poppy

The latest Friday challenge at JustRite Papercrafts is to "Colour it Pretty".  Well, I realised when I had finished this one, that it is coloured rather bright and cheerful, but still pretty, I think(?)  I started with background papers from Playdate paper pad by My Mind's Eye, and layered them onto light blue cardstock.  I covered the join with blue spot ribbon and added a bow.  Next, I stamped the medallion from JustRite's Botanical Medallions & Banners set with Memento Paris Dusk ink onto light blue cardstock and die cut it with a JustRite's Nested Oval Medallion Labels die.  I stamped the poppy image from the same stamp set with Memento Tuxedo Black ink onto blending card, coloured it with copics and die cut it with a Spellbinders Classic Oval die and added it to the medallion with foam tape.  Finally, I stamped the sentiment from JustRite's Haberdashery Vintage Labels Five set with the Paris Dusk ink directly onto the background paper.

Copic Colours used were:  R22, R24, R27, R89, YR20, Y21, Y26, G40, G43, G46, B21, B26.

Thanks for coming to visit my blog!

Autumn Thanks

This months challenge at Scrapbook Boutique is to use autumn colours, so I chose my background paper from the Citrus Stack by DCWV and layered it onto dark red cardstock.  The image is from Flourishes Dahlias set, stamped with Memento Tuxedo Black ink onto blending card, coloured with copics and die cut with a Spellbinders Labels Eight.  Then I die cut brown cardstock with a Spellbinders Decorative Labels Eight and added that to the card front and attached the image piece with foam tape.  The sentiments used for this one come from Flourishes With Gratitude stamp set.  One was stamped onto the image piece and the other was made into a tiny tag and attached with a dark red ribbon and bow.

Copic Colours used were:  YR00, YR02, YR04, YR20, Y21, Y26, R81, R83, R85, R89, G40, G43, G46.

Thanks so much for coming to visit!


Saturday 17 May 2014

In The Mood

Well, you never know what those girls at Power Poppy are going to come up with next!!  This weeks inspiration for the"Unabashedly Upbeat Challenge" is a Thelonious Monk album cover.  What FUN!  The plan was to do housework this morning, but this challenge just grabbed me and wouldn't let go so I chose my background papers from the Enchanted paper pad by Memory Box and layered them onto bright blue cardstock with the vertical panel punched with the EK scalloped scallop border punch.  Then I die cut black cardstock with the Virtuoso Music die by Memory Box, cut it half and adhered the two halves to the card front.  I added a little tab of purple and blue cardstock die cut with two Spellbinders Labels 4 just for the heck of it.  Then I used the wonderful Power Poppy digital Gerbera Daisies on blending card, cut into a rectangle, coloured in grey tones with copics, sponged around the edge with Versacolor Cyan ink and layered onto purple cardstock, and added that piece with foam tape.  I cut the single word out of the sentiment from the Peonies set, made it into a notched tag and popped it on top.

Copic Colours used were: C1, C3, C5, C7.

Thanks so much for visiting!

Tuesday 13 May 2014

So Glad!

I'm so glad to say that Power Poppy have launched their very first challenge, "Pop Goes the World" with a lovely photo incorporating purple, orange, yellow and green for inspiration, and using one of the new digital stamps.  I decided to use papers from  the Lilac Avenue Collection paper pad by Kaisercraft, layered onto lilac cardstock, and with the horizontal piece punched with Martha Stewart's doily lace punch.  I chose to use the gorgeous Gladioli set, coloured it with copics, sponged on some Versacolor Orange and Canary ink, and die cut it with a Spellbinders Standard Circle die.  I die cut green cardstock with a Spellbinders Scallop Circle die and lilac cardstock with the largest Spellbinders Exquisite Circle, layered them all together and added this piece with foam tape.  I printed the sentiment into a small circle, punched it out with a circle punch and layered it onto lilac cardstock.  A lilac ribbon and bow finished it off. 

Copic Colours used were:  V04, V12, V15, Y11, YG11, YG13, YG17.

Thanks so much for coming to visit!

Sunday 11 May 2014

Bicycle on a Blackboard

The latest Friday challenge at JustRite Papercrafts is to create a Chalkboard Birthday card.  Now, I have to admit that embossing powder is not my friend!  I never seem to be entirely happy with the result.  So, for this card, I decided to use a die cut for my "chalk".  I started with paper from a Cre8tiv black and white mini paper stack, layered it onto black cardstock and wrapped black and white spot ribbon around it.  Next, I die cut black cardstock with a Spellbinders Timeless Rectangle die for the "blackboard".  I die cut white cardstock with the Retro Bike die by Fancy That and added that to the blackboard.  Then I stamped the sentiment from JustRite's Birthday Sentiments Set (retired - but still oh, so useful!) with black ink onto white cardstock, punched it out with a circle punch, and layered it onto black cardstock which had been die cut with a Spellbinders Standard Circle and then onto white cardstock die cut with a Spellbinders Scallop Circle.  This piece was then added with foam tape.  A spotted bow finished off my version of  a chalkboard card.

Thanks for visiting my blog!

Thursday 1 May 2014

Purple Power

YAY! It's Release Week at Power Poppy, and, this month there are four fabulous flower images for sale - check them out HERE.  And, these ones are digital, and that, I've discovered, equals instant happiness!  I've never bought digital stamps before, but I just had to have these, and I bought, downloaded, re-sized and printed them without any trouble - and, if I can do it, anyone can.
I started this card with paper from The Romantic Garden paper pad by Meg's Garden, layered it onto dark purple cardstock, added some white lace down the side plus some lilac seam binding.  Next, I die cut some more of the purple cardstock with a Spellbinders Captivating Squares die and also a Classic Square die.  Then I die cut some pale lilac cardstock with a Spellbinders Classic Scalloped Square die and layered all three onto the card front.  I die cut the Power Poppy Peonies image with a Spellbinders Standard Circle die, coloured them with copics and added this with foam tape.  A bow made with the lilac seam binding finished it off.

Copic Colours used were: BV0000, BV11, BV13, BV17, G43, G46.

Thanks so much for coming to visit!

Friday 25 April 2014

Kraft with Pink Daisies

The latest Friday Challenge at JustRite Papercrafts is to make a card using Kraft.  I chose my background papers from Kaisercraft's True Romance paper pad and layered them onto Kraft cardstock with the horizontal panel having a punched bottom edge, and adding some brown and cream lace and pink ribbon. I decided to use two fabulous images from JustRites's Botanical Medallions & Banners stamp set.  I stamped the background medallion with Memento Tuxedo Black ink directly onto Kraft cardstock and die cut it with the matching JustRite Custom die then added it to the card front.  Then I stamped the daisies with the same ink onto blending card, coloured them with copics, cut them out and added them to the medallion with foam tape.  A couple of rhinestone flourishes and a pink bow and it was done.

Copic Colours used were:  RV000, RV00, RV02, E43, E44, E47, G40, G43.

Thanks so much for coming to visit!

Saturday 12 April 2014

Spring Flowers

This months inspiration challenge at 
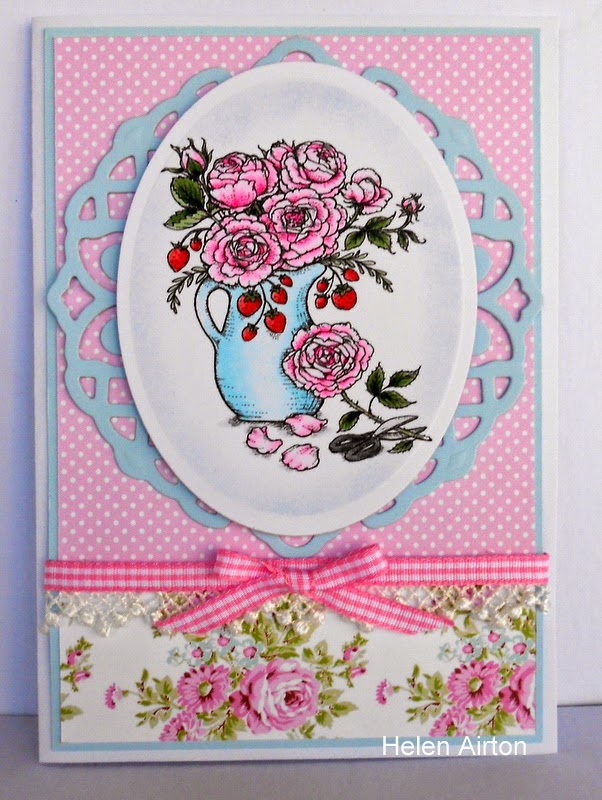
Scrapbook Boutique features pink roses and other small flowers in yellow, white and lilac.  I thought that this was the perfect opportunity to use this brand new image from the brand new stamp company, Power Poppy.  Power Poppy is owned by the amazingly talented artist, Marcella Hawley and promises to be something really special in the cardmaking world.  Check it out HERE.  I chose my background papers from Prima's Meadow Lark collection and layered them onto lilac cardstock.
I then added some lilac May Arts net ribbon plus some pink satin ribbon across the bottom.  Next, I die cut pink cardstock with a Spellbinders Captivating Squares die, and then some light brown cardstock with a Spellbinders Marvelous Squares die and attached them to the centre of the card front.  The sentiment is from Power Poppy's Azalea stamp set and is layered onto lilac cardstock.  The image is stamped with Memento Tuxedo Black ink onto blending card, coloured with copics and die cut with a Spellbinders Standard die, and then added with foam tape.  A pink satin bow was the final touch.

Copic Colours used were: RV000, RV00, RV02, BV000, BV11, BV13, B0000, B60, B63, Y000, Y11, Y15, YG11, YG13, YG17, G24, G28, G40, G43, G46.

Thanks so much for coming to visit!

Monday 7 April 2014

Vintage Shoe

This weeks challenge at JustRite Papercrafts is to use masking.  Now, JustRite have wonderful cut files that make this technique ridiculously easy - you can see a great tutorial about it HERE.  However, I (sadly) don't own any of these, so it was fussy cutting for me!  I chose to use the shoe and flowers from JustRite's Shoes Vintage Labels Six stamp set, and as that makes for quite a large image, I decided to make a fancy edged card by die cutting folded white cardstock with a Spellbinders Decorative Labels Eight die, and then cutting more white cardstock with the same die for the card front.  Next, I masked the flower stems on the stamp with a post-it note, inked it with Memento Tuxedo Black ink and stamped it onto blending card.  Then, I stamped the flowers again onto another post-it note, cut it out and stuck it over the image on the blending card.  Then I stamped the shoe over the top, and, after removing the post-it note, my image looked like the flowers were poking out of the top of the shoe.  Then I added the sentiment from JustRite's Botanical Medallions & Banners stamp set, die cut the whole thing with a Spellbinders Labels Eight, sponging around the edge with pink ink while the card was in the die and layering it onto purple cardstock.  A bow made with lilac seam binding finished it off.

Copic Colours used were:  BV0000, BV000, BV01, BV02, BV13, RV00, RV02, Y11, Y15, G43, G46, C3, C5, C7, C9.

Thanks so much for visiting!

Thursday 3 April 2014

Wonderful Friend

I made this card for this months Sketch Competition at The Scrapbook Store.  I had to omit some of the elements as the original sketch was meant for scrapbooking and it was all too much for a little card, but it is such a cute sketch, I just had to give it a try.  The background paper is from the Spring Drop collection by First Edition, layered onto pink cardstock.  Next, I added two pieces of May Arts net ribbon which I had coloured with Copic BG13 to match, then a paper doily coloured with Copic RV21.  I stamped the sentiment from Flourishes Butterfly Blossoms stamp set onto white cardstock, die cut it with a Spellbinders Standard Circle die and layered it onto aqua cardstock die cut with a Spellbinders Classic Scallop Circle.  Then I die cut  more aqua cardstock with a Spellbinders Captivating Squares die and added that to the card front.  Next, I stamped the image from the same Flourishes set with Memento Tuxedo Black ink onto blending card, coloured it with copics and cut it into a square and added it with foam tape.  Finally, I added some pink bling in the flower and two butterflies to mimic some elements in the sketch.

Copic Colours used were:  RV000, RV21, RV23, Y21, Y26, BG10, BG13, BG32, G40, G43, G46.

Thanks for coming to visit!

Thursday 27 March 2014

Easter Daisies

This months challenge at Scrapbook Boutique is for an Easter theme with white daisies, raspberry pink and grey.  My background paper is from a Cre8tiv mini stack layered onto grey cardstock.  I used a Martha Stewart border punch to punch some more grey cardstock, wrapped it with yellow grosgrain ribbon and attached it near the top of the card front.  I also die cut grey cardstock with a Spellbinders Floral Flourishes die and added it near the bottom.  I stamped the daisies image from JustRite Papercrafts Botanical Medallions & Banners stamp set with Memento Tuxedo Black ink onto blending card, coloured it with copics and die cut it with a Spellbinders Opulent Ovals die, then sponged it with Versacolor Opera Pink ink.  Than I die cut white cardstock with the next size Opulent Oval and attached it over the grey flourish.  The sentiment is from Stampin' Up!'s Teeny Tiny Sentiments set and made into a notched tag.  Finally, I added the image piece with foam tape plus a yellow bow.

Copic Colours used were:  Y00, Y11, Y15, B0000, G43, G46, C1.

Thanks so much for coming to visit!

Monday 24 March 2014

Happiness

Happiness is.......a Sketch Challenge!!  This weeks challenge at JustRite Papercrafts is to use their gorgeous sketch - Yes!!  I chose my background papers from Kaisercraft's Magic Happens Collection and layered the horizontal piece onto white cardstock which had been border punched with Martha Stewart's doily lace punch.  The slanted rectangle piece was created using Spellbinders Radiant Rectangles dies (one of my all-time favourite sets).  The image is from JustRite's Botanical Medallions & Banners set, stamped with Memento Tuxedo Black onto blending card, die cut and coloured with copics.  The sentiment is from the same stamp set and made into a notched tag.  The flower and leaves are die cut with Spellbinders Daisy Heads dies, and the butterflies are die cut from blending card using a Spellbinders Flying Beauties die, and coloured with copics, then added with foam tape.  I was in the mood for some sparkle with this one, so I used rhinestones for the butterfly bodies, the top left corner treatment and the flourishes.  Such a beautiful sketch - thanks, JR, I really enjoyed this one!

Copic Colours used were:  B60, B63, BV13, YG11, YG13, YG17, V000, V01, V12.

Thanks so much for coming to visit!

Thursday 20 March 2014

Oriental Dahlias

This week at Timeless Tuesday, the challenge is to incorporate A Touch Of Gold.  For this one, I chose my background papers from Papermania's Oriental Treasures paper pad as many of them have gold foil accents.   I layered the two papers onto black cardstock and then onto metallic gold cardstock.  Then I punched some black cardstock with Martha Stewart's lace doily trim punch and layered that onto metallic gold cardstock to cover the join in the background papers.  I stamped the sentiment from Flourishes Dahlias stamp set directly onto the background with Memento Tuxedo Black ink, then stamped the large dahlia image onto blending card, coloured it with copics, cut it out with scissors and attached it with foam tape.

Copic Colours used were:  R32, R35, R37, R89, Y21, Y38, G40, G43, G46.

Thanks for visiting my blog!

Sunday 9 March 2014

Tres Chic!


This weeks challenge at Timeless Tuesday is to use masking.  I thought this elegant shoe image from Flourishes Feminine Charm set would be ideal for this.  I stamped the shoe with Memento Tuxedo Black onto blending card, then onto a post-it note which I cut out, adhered over the image on the blending card, then stamped the shoe again so that it looked like a pair instead of a single shoe.  I coloured the shoes with copics and die cut them with a Spellbinders Exquisite Circles die.  I also die cut some pale peach cardstock with a Spellbinders Classic Scallop Circle die and then some kraft cardstock with a Spellbinders Standard Circle die and adhered all three circles together.  The beautiful background paper is from The Romantic Garden collection from Meg's Garden.  I layered it onto peach cardstock and then onto kraft cardstock and added some peach lace along the bottom.  Finally, I stamped the sentiment (also from Flourishes Feminine Charm set), and made it into a notched tag.

Copic Colours used were:  R000, R01, R02, E50, E51, E43, E44, E47, YR24.

Thanks for coming to visit!

Thursday 27 February 2014

Country Scene

This weeks challenge at Timeless Tuesday is to use a stamped image but no colouring.  No Colouring!!?!  Well, that's certainly not my usual M.O. but I had to give it a try.  I chose this image from Flourishes Country Road stamp set, stamped it onto Very Vanilla (SU) cardstock with Versacolor Turquoise ink, and die cut it with a Spellbinders Radiant Rectangle die.  Then I die cut some turquoise cardstock with the next size Radiant Rectangle and adhered the image to it.  The background paper is from the Home Grown paper set from Hot Off The Press, layered onto turquoise cardstock.  Next, I cut out a piece of cream burlap - known as hessian here in Australia - and adhered it to the top left side of the card front.  I added the image piece with foam tape, then put three brown brads in the hessian and some heavy twine with a knot tied in it on the right hand side.

Thanks for visiting!

Wednesday 26 February 2014

Spring Colours

The latest challenge at JustRite Papercrafts is to make a card with Cheerful Spring Colours.  Well, it's still hot Summer here in Australia, but I do feel for my American friends with your longing for Springtime as you come to the end of a very long cold Winter.  So, for this card, I chose the background papers from First Edition's Spring Drop collection, layering the background onto lilac cardstock, and the horizontal strip onto white cardstock which had been punched with Martha Stewart's picket fence border punch.  I created a frame by die cutting white cardstock with two Spellbinders Labels 20, then die cut blue cardstock with the larger label 20 for backing.  Then I die cut white cardstock with Spellbinders Fancy Lattice and sandwiched it between the frame and the backing.  I chose the daisy image from JustRite's Botanical Medallions & Banners stamp set, stamped it with Memento Tuxedo Black onto blending card, coloured it with copics, cut it out and added it to the frame piece with foam tape.  The sentiment is from JustRite's Seeds of Summer set and made into a notched tag.  Lilac ribbon and a bow finished it off.

Copic Colours used were:  RV000, RV00, RV02, BV0000, BV000, BV01, B000, B00, B02, Y21, Y26, YG03, YG63. 

Thanks so much for visiting!

Thursday 20 February 2014

Vintage Dots

This weeks challenge at Timeless Tuesday is to use polka dots.  At first, I thought it should be something fun, but then I decided to go for a classic and vintage look.  I stamped this gorgeous lady from Flourishes Glamour Girls set with Memento Tuxedo Black onto blending card, coloured her with copics and die cut with a Spellbinders Classic Oval die.  It's a bit hard to see, but I put polka dots on her dress, using a copic blender.  The background paper is from First Edition's Floral Pavilion collection layered onto black cardstock.  I added half a paper doily, then some white lace and pink seam binding down one side.  I die cut some black cardstock with a Spellbinders Opulent Oval die and attached that over the doily then added the image piece with foam tape.  A seam binding bow and some black pearls and it was finished!

Copic Colours used were:  E000, E01, Y21, Y26, RV000, RV00, RV02, RV04 and C7 to enhance the black in the hat.

Thanks for coming to visit!

Friday 14 February 2014

Blushed Roses

This months inspiration challenge at Scrapbook Boutique features pale pink roses teamed with dark brown and the word, Love.  I chose my background papers from an old Kaisercraft collection called "Blushed", and layered them onto dark brown cardstock.  I punched some more dark brown cardstock with a Martha Stewart trim punch and added that to the vertical panel.  Then I die cut dark brown cardstock with a Spellbinders Marvelous Squares die and added it to the card front.  I stamped the word "Love" from Flourishes Tag Lines set with Memento Rich Cocoa ink onto white cardstock and punched it out with a 1" circle punch then added it with foam tape to a piece of dark brown cardstock die cut with a Spellbinders Scalloped Square.  Finally, I stamped the roses from Flourishes Calendar Set 2 with Memento Rich Cocoa onto blending card, coloured it with copics, die cut it with a Spellbinders Standard Circle die and added it with foam tape.

Copic Colours used were:  RV000, RV00, RV21, YG11, YG13, YG17.

Thanks so much for coming to visit!

Thursday 13 February 2014

Fishing

This weeks challenge at Timeless Tuesday is to use a wood element.  I needed some more masculine cards for my stash and thought the wood theme would be perfect for this.  I started with a piece of grey cardstock and embossed it with Cuttlebug's Woodgrain EF.  Then I added a piece of Kaisercraft's Whitewash paper from the Base Coat Collection plus a birthday sentiment from Stampin' Up!'s Teeny Tiny Sentiments set and layered the whole lot onto black cardstock.  I die cut some more black cardstock with one of the Spellbinders Fancy Tags Two dies, cut it in half and adhered the two halves to the card front.  I also cut a piece of black cardstock with a Cuttlebug Vintage corner die and placed it in the top right corner of the card front.  Finally, I stamped the fishing bag image from Flourishes What A Catch set with Memento Tuxedo Black onto blending card, coloured it with copics, cut it into a square, layered onto black cardstock and adhered it on top of the fancy tag with foam tape.

Copic Colours used were:  C1, C3, C5, C7, C9.

Thanks for visiting!

Wednesday 12 February 2014

90th Birthday

This weeks challenge at JustRite Papercraft is to use a flower or butterfly stamp or die.  Well, that was an easy one!  I chose the petunia image from JustRite's Seeds of Summer set and stamped it with Memento Tuxedo Black onto blending card, coloured it with copics and die cut it with a Spellbinders Classic Ovals die.  The background paper is from First Edition's Dreamcatcher paper pad, layered onto pink cardstock.  I added some lace and pink ribbon down one side, then die cut some pink cardstock with the largest Spellbinders Opulent Ovals die, and then some lilac cardstock with a smaller die from the same set.  The image piece was added with foam tape and then a Zva pearl flourish.  My Mum had asked me to make a card for her friend's 90th birthday, so I die cut some lilac cardstock with the numbers from Cuttlebug's Baby Face die set, ran the numbers through my Xyron and stuck them to pink cardstock which had been die cut with the smallest Spellbinders Lacey Circles die.  Then I die cut lilac cardstock with a Spellbinders Standard Circle, added the number piece and then added that to the card front with foam tape.

Copic Colours used were:  V01, V12, V15, V17, RV00, RV02, RV13, YG11, YG13.

Thanks so much for coming to visit!

Friday 7 February 2014

Music of the Heart

This weeks challenge at Timeless Tuesday is to make a card with the colour red and a love theme.  I chose my background papers from the With Love collection from the Me To You range (Papermania) and layered them onto red cardstock.  Next, I just had to use my new Spellbinders set - Lace Hearts, which my DD gave me for Christmas.  I die cut red cardstock with the large lace heart and adhered it to the card front.  I covered the join in the papers with red ribbon and added some pearls.  Then I stamped the sentiment from Flourishes Love Notes with red ink onto white cardstock, layered it onto red cardstock and added it to the top right corner.  Finally, I stamped the violin and bow from the same stamp set with Memento Tuxedo Black onto blending card, coloured the violin with copics, and cut them out .  I put the bow image through my Xyron and stuck it to the die cut heart, then added the violin with foam tape.

Copic Colours used were:  E21, E23, E25.

Thanks so much for visiting!

Sunday 2 February 2014

Sweet Violets

The challenge at Timeless Tuesday this week is to use purple.  Yay!  My favourite colour - so that was an easy one, but deciding which flower stamp to use - now that was difficult.  However, I decided on the obvious choice - Flourishes Sweet Violets!  The background papers are from the Enchanted Collection by Memory Box, layered onto lavender cardstock, and I have used Martha Stewart's pansy border punch on the vertical panel.  The large image and the sentiment from Flourishes Sweet Violets set was stamped with Memento Tuxedo Black onto blending card, coloured with copics and die cut with a Spellbinders Labels 18 die.  The image piece was added with foam tape.

Copic Colours used were:  B0000, V12, BV01, BV02, YG03, YG11, YG13, YG63.

Thanks so much for coming to visit!

Tuesday 28 January 2014

Red, White & Blue

This weeks challenge at JustRite Papercrafts is to use background stamps in an un usual way.  I was inspired by Heidi Blankinship's tutorial on cutting stamped background into different shapes.  So I stamped JustRite's Vintage Wallpaper background stamp with Stampin' Up! Real Red ink onto white cardstock, cut it into three equal horizontal strips and layered them onto blue cardstock.  Then I stamped JustRite's Scrolled Vine background stamp with Versacolor Indigo ink onto white cardstock, cut out one of the decorative pieces and layered it onto blue cardstock which had been punched on one end with a Martha Stewart border punch to make the vertical panel.  Then I stamped the image from JustRite's Anchors Away set with Memento Tuxedo Black ink onto blending card, then added the ship image by inking it with the Indigo ink, stamping it once onto scrap paper then onto the image and then over-stamping it with the sentiment.  Then I coloured the image with copics, cut it out, layered it onto blue cardstock and added it to the card front with foam tape.  Finally, I stamped a portion of the Vintage Wallpaper stamp with the Indigo ink, die cut it with the two smallest Spellbinders Squares Nestabilities to create a frame, cut it in two diagonally and adhered the two pieces to the two right hand corners of the card front.

Copic Colours used were:  R24, B26, C1, B0000.

Thanks so much for visiting my blog!

Friday 24 January 2014

New Home

The challenge at Timeless Tuesday this week is to make a card celebrating Something New.  There were a few choices for this one, but I decided to make mine a housewarming card for a new home.  The background papers are from Prima's Meadow Lark Collection layered onto lavender cardstock.  For the vertical panel, I used my brand new EK border punch - scalloped scallop.  Then I die cut some more lavender cardstock with a Spellbinders Gold Labels Four.  I stamped the image from Flourishes On The Porch set with Memento ink onto blending card, coloured it with copics, die cut it with a Spellbinders Classic Oval and sponged it with Versacolor's Baby Blue ink.  The sentiment is from the same stamp set, stamped onto white cardstock and layered onto lavender.  Finally, I attached the image piece with foam tape.

Copic Colours used were:  C1, B00, B02, BV000, BV01, V04, V12, RV52, RV55, Y21, Y26, YG03, YG11, YG13, YG17, YG61, YG63, YG67.

Thanks so much for coming to visit!